MaterialShowcaseViewを使ってみたので、
そのコードを載せておきます。
アプリの操作説明などに使えますね。
Git:
https://github.com/deano2390/MaterialShowcaseView
build.gradle(Project)
allprojects {
    repositories {
        jcenter()

        maven { url "https://jitpack.io" }
    }
}
build.gradle(Module.app)
dependencies {
    compile fileTree(dir: 'libs', include: ['*.jar'])
    androidTestCompile('com.android.support.test.espresso:espresso-core:2.2.2', {
        exclude group: 'com.android.support', module: 'support-annotations'
    })
    compile 'com.android.support:appcompat-v7:25.3.1'
    compile 'com.android.support.constraint:constraint-layout:1.0.2'
    compile 'com.github.deano2390:MaterialShowcaseView:1.1.0@aar'
    testCompile 'junit:junit:4.12'
}
activity_main.xml
TextView、Button、EditTextでやってみようと思います。
<RelativeLayout xmlns:android="http://schemas.android.com/apk/res/android"
    xmlns:app="http://schemas.android.com/apk/res-auto"
    xmlns:tools="http://schemas.android.com/tools"
    android:layout_width="match_parent"
    android:layout_height="match_parent"
    tools:context="fureate.com.testproject.MainActivity">

    <TextView
        android:id="@+id/text_view"
        android:layout_width="wrap_content"
        android:layout_height="wrap_content"
        android:layout_alignParentTop="true"
        android:layout_centerHorizontal="true"
        android:layout_marginTop="20dp"
        android:text="TextView"
        android:textSize="30sp" />

    <Button
        android:id="@+id/button"
        android:layout_width="wrap_content"
        android:layout_height="wrap_content"
        android:layout_centerInParent="true"
        android:text="Button"
        android:textSize="30sp" />

    <EditText
        android:id="@+id/edit_text"
        android:layout_width="wrap_content"
        android:layout_height="wrap_content"
        android:layout_alignParentBottom="true"
        android:layout_centerHorizontal="true"
        android:layout_marginBottom="20dp"
        android:text="Edit Text"
        android:textSize="30sp" />

</RelativeLayout>
MainActivity.java
対象を1つと複数にするコードをやってみます。
protected void onCreate(Bundle savedInstanceState) {
super.onCreate(savedInstanceState);
setContentView(R.layout.activity_main);
TextView textView = (TextView) findViewById(R.id.text_view);
Button button = (Button) findViewById(R.id.button);
EditText editText = (EditText)findViewById(R.id.edit_text);
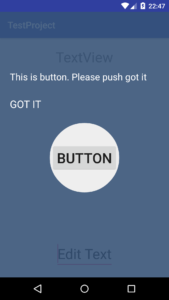
// 対象を1つにする場合
new MaterialShowcaseView.Builder(this)
.setTarget(button)
.setDismissText("GOT IT")
.setContentText("This is button. Please push got it")
.setDelay(0)
.singleUse("1000")
.show();
}
setTarget:対象とするViewを設定します。
setDismissText:ボタン名を設定します。
setContentText:メッセージを設定します。
setDelay:何秒後にMaterialShowcaseViewを表示させるか設定します。
singleUse:キーを設定します。(1回使用するとこのキーで表示しなくなるので、何回も表示させたい場合は毎回キーを設定し直します。)
protected void onCreate(Bundle savedInstanceState) {
super.onCreate(savedInstanceState);
setContentView(R.layout.activity_main);
TextView textView = (TextView) findViewById(R.id.text_view);
Button button = (Button) findViewById(R.id.button);
EditText editText = (EditText)findViewById(R.id.edit_text);
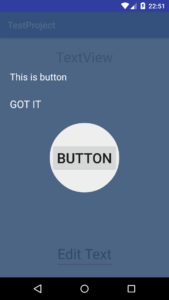
// 対象を複数にする場合
ShowcaseConfig config = new ShowcaseConfig();
config.setDelay(500);
MaterialShowcaseSequence sequence = new MaterialShowcaseSequence(this, "5000");
sequence.setConfig(config);
sequence.addSequenceItem(button,
"This is button", "GOT IT");
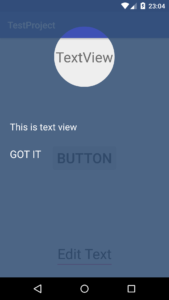
sequence.addSequenceItem(textView,
"This is text view", "GOT IT");
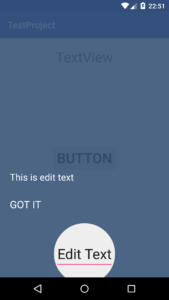
sequence.addSequenceItem(editText,
"This is edit text", "GOT IT");
sequence.start();
}
config.setDelay:Viewを表示させる間隔時間の設定をします。
new MaterialShowcaseSequence(this, “5000”):”5000″の部分はキーです。
(ここでもキーは一回限りなので、毎回表示させたい場合はキーを変更してください。)
sequence.addSequenceItem:追加するViewとメッセージ、ボタン名を入力します。
以上です。